(For Windows)
Let's suppose a customer is standing at the counter and you want to quickly print the receipt or estimate without making the customer wait. Wouldn't it be nice if the ticket, invoice, and estimate print automatically without clicking the print option and you can hand it over to the customer within seconds?Our Google Cloud Print has been serving its purpose for a few years, but it can take a while (several seconds or even minutes) for the job to get ready and actually print. To make the printing process faster and easier, we have come up with direct print integration support, where any of your connected printers can print the receipt or invoice in a matter of seconds. All you need to do is to set it up properly and you are good to go.
Steps to Set up
To set up the printer, perform the series of simple steps as explained below
1. Head to Store Settings --> Hardware settings --> Direct Print Support
2. To enable direct print support, simply hit Yes against option to print directly.
3. To make direct print integration work, you will have to download and install QZ tray according to the OS being used.
Click on Click Here button and you will get the pop-up from where you can download and install QZ tray.
4. For QZ tray to work certain JDKs are required, click on Download button and you will get the link to safe driver as shown below
On hitting download, you will get the link to safe driver as shown below
5. Hit Save File button and driver will be saved successfully in your system. Click on Run to install the driver to your system
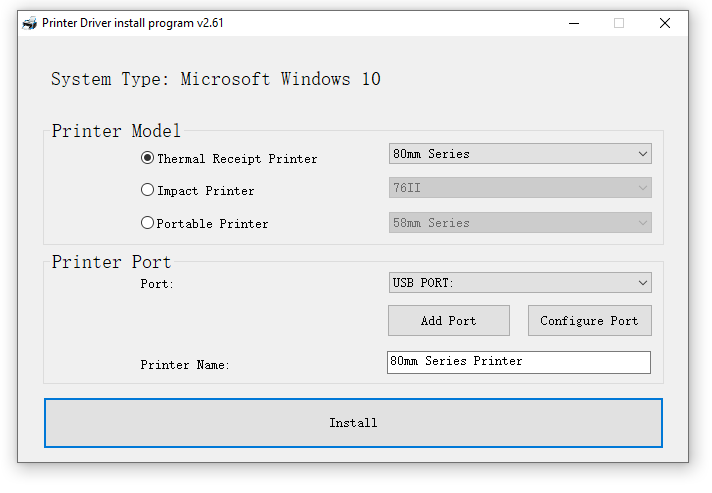
7. When Rongta driver is downloaded, start installation by clicking Install button
In Installation process, the following screen appears where you can select a port and rename your printer

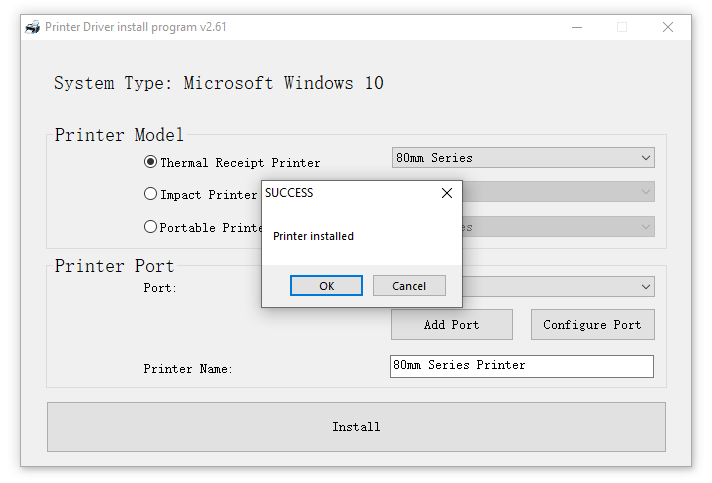
After clicking on Install you will get a success message

8. Next step is to Sync all existing printers that are on the same network by hitting Sync Printers button
By hitting Click Here, all existing printers will be synced automatically and listed under manage printers section as shown above.
By clicking on Manage Printers, you will be directed to following screen where you can set up the Rongta series printer
There you can select the printer type, map printer with hardware, set interface type and paper size. Moreover you can set when do you want to get direct prints from that printer and cash drawer settings.
Once the printer is setup and ready to use, whenever a repair ticket , estimate or invoice is created, it will be printed automatically depending upon the printer settings.
Frequently Asked Questions
Q. How can I uninstall printer?
A. Please note that printer will not be uninstalled directly from windows or from control panel. To uninstall the printer, you need to perform following steps
1. Press Windows key and r key together and type services.msc and hit enter
2. You will get the following pop-up after hitting enter from where you need to select Print Spooler --> right click --> hit stop.
3. Then head to C drive on windows --> Printers --> System 32 --> Select Spool --> Printers and you will see no printer exists in this folder.
Q. Is there any option to test if the printer is connected successfully?
A. From control panel --> head to Printers and Scanner and click on your desired printer. Click on Manage and there you will get an option to test the printer.
Q. My Rongta Printer(80mm) not printing the correct size, how to solve it?
A. The case in which Rongta 80mm is not printing correctly (cuts off the edges, printing in an abnormal size), head to Printers and Scanners, click on Manage-->Printer Properties
After clicking on Printer properties --> Preferences --> Advanced
On the following screen set Paper Size either 297mm or 210mm and click OK.

.png)
.png)
.png)
.png)

.png)
.png)
.png)


