RepairDesk Forms
Please check the video below:-
Setup Guide

.png "Image: https://d1ivv9tj0dbuhh.cloudfront.net/uservoice-assets/Untitled (1).png")
- Steps that you can add to your flow as per your choice.
- Live URL which will be public facing that your customers will use to access your widget flow.
- Iframe code with which you can embed your widget flow directly on your company website.
- Once your customer completes the widget flow, create a ticket or lead. The Ticket/Lead reference ID will be appended to the ticket or lead to help differentiate which leads or tickets come from each flow.
.png "Image: https://d1ivv9tj0dbuhh.cloudfront.net/uservoice-assets/Untitled (2).png")
.png "Image: https://d1ivv9tj0dbuhh.cloudfront.net/uservoice-assets/Untitled (5).png")
Your customers can choose the category as per their requirement.
.png "Image: https://d1ivv9tj0dbuhh.cloudfront.net/uservoice-assets/Untitled (11).png")
.png "Image: https://d1ivv9tj0dbuhh.cloudfront.net/uservoice-assets/Untitled (9).png")
.png "Image: https://d1ivv9tj0dbuhh.cloudfront.net/uservoice-assets/Untitled (10).png")
The checkbox will allow you to add the particular detail whereas the “Required” toggle will allow you to make that detail mandatory.


- Customer details step is mandatory.
- Address, City and Postcode need to be included in the customer details.
- You can not delete customer details as this step is dependent on it.


- Title: Add a service title.
- Show Search Bar: Lets you display repair services against brands and models for your customers.
- Service Charges: You can also allow customers to your see service charges


.png "Image: https://d1ivv9tj0dbuhh.cloudfront.net/uservoice-assets/Untitled (22).png")
- You can customize your confirmation message and check your ticket reference which will transfer you to the customer portal. From customer portal you can check the details you filled in. You can also generate a ticket label for your reference.
- You can redirect the customer to the website by adding URL.
.png "Image: https://d1ivv9tj0dbuhh.cloudfront.net/uservoice-assets/Untitled (23).png")

.png "Image: https://d1ivv9tj0dbuhh.cloudfront.net/uservoice-assets/Untitled (25).png")
.png "Image: https://d1ivv9tj0dbuhh.cloudfront.net/uservoice-assets/Untitled (26).png")
.png "Image: https://d1ivv9tj0dbuhh.cloudfront.net/uservoice-assets/Untitled (27).png")
.png "Image: https://d1ivv9tj0dbuhh.cloudfront.net/uservoice-assets/Untitled (28).png")
.png "Image: https://d1ivv9tj0dbuhh.cloudfront.net/uservoice-assets/Untitled (29).png")
- Access RepairDesk Forms Integration: First, navigate to the RepairDesk forms integration section within your account. This area allows you to manage and customize your forms.


4. Edit Payments:
- Click on the "Payments" widget you've just added to start configuring it.

- Access the "Configurations" section to set up your payment options.
- Payment Method: The payment method configured in your settings (e.g., 'RD Pay') will be applied here.
- Payment Type: Decide how you want to collect payment. You have two options:
- Flat Deposit Amount: Specify a flat amount that you wish to collect upfront.
- Based on Service Charges: Opt to collect a payment based on a percentage of the service charges.
- Mandatory Payment: Choose whether to make the payment mandatory for your customers. This option can be toggled on or off according to your preference.
- Save Your Settings: After configuring your payment settings, click "Save" to apply the changes. Your form is now set up to receive payments from your customers.


Q. Can my customers download a summary of their RD Form inquiry?
Yes, you can now enable customers to download a PDF summary of their inquiry after submitting the RD Form—right from the confirmation screen.
To enable this:
- Go to the Confirmation Step in your RD Form builder.
- Turn on the toggle labeled "Allow customers to download inquiry details."
- (Optional) Customize the button label that appears after submission.
- Once enabled, customers will see a Download Inquiry Details button after they complete the form.
- Clicking this button will generate a PDF containing all submitted information—structured in the same order as your RD Form steps.
Skipped steps won’t appear in the file, and the layout follows the order of your configured form steps. This not only helps your customers stay informed but also reduces back-and-forth clarification for your team.
Q. Can I send automated emails to my employees when a form is submitted?
A: Yes! You can now automatically send form submission copies to employees when a customer fills out an RD Form.
Here’s how you can set it up:
- Go to Settings > Integrations > RD Forms.
- Create a new form or edit an existing one.
- Click on the 3 dots and select “Email for Admin” option.
- Toggle the new option "Send an email to employees when a form is filled" based on your preference.
- Select one or multiple employees from the list who should receive an email when the form is submitted.
Q: Can I set a default ticket status and task type for tickets generated through a specific RD Form?
A: Yes! Two new dropdown options have been added to the confirmation widget step of each form.
You can now select a default ticket status and default task type that will automatically apply to all tickets created via that form. This helps streamline your workflow by ensuring tickets start with the right settings based on the form used.
Q: Can I verify a customer’s email address in RD Forms?
Yes. We’ve added email verification to the Customer Detail widget step in RD Forms.
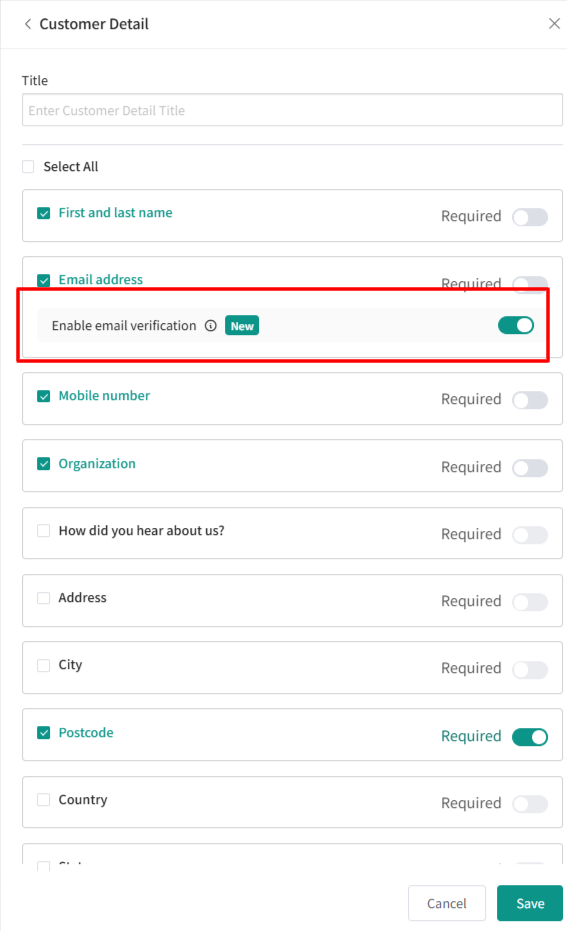
When a customer enters their email:
- They’ll receive a verification code at the provided address.
- The customer must enter the code in the form to confirm the email is valid.
This ensures that the email address collected through RD Forms is correct and usable for receipts, notifications, and future communication.
- Go to Module Config > Estimates.
- Look for the new trigger labeled “Display custom form fields submitted via RepairDesk Forms on Estimates.”
- Enable this option.
Q: Can RD Forms custom fields automatically map to repair categories in a Ticket?
A. Yes. If the name and label of a custom field in your RD Form match the custom field name in a repair category on the Ticket, the system will automatically map the submitted value to that field in the Ticket.
This saves time by eliminating the need to re-enter information and ensures consistency between what the customer provides in the form and what appears in the Ticket.
Q: How are attachment labels shown in Tickets?
A. Labels are now displayed next to each attachment in the Attachment History on the New Ticket UI.
This makes it easier to quickly identify files — for example, “Upload back side of phone” or “Upload front side of phone” — so your team can review and act on attachments without confusion.
A. Yes. You can now upload multiple images in the Custom Form step of RD Forms, making it easier to document a device from multiple angles during the repair intake process.
A. Yes. You can now enable the "Show Service Description" option when editing the Service Step in your RD Forms widget flow. Once enabled, the description saved against each service in Manage Services will automatically appear below the service name on the customer-facing form. Long descriptions are trimmed to two lines with a "See More" link for customers to expand the full text.